Migrating mom to Uaas
We've all been there, built a website for a family member / friend / pet and now it's starting to show it's age, as you've neglected it for far too long.
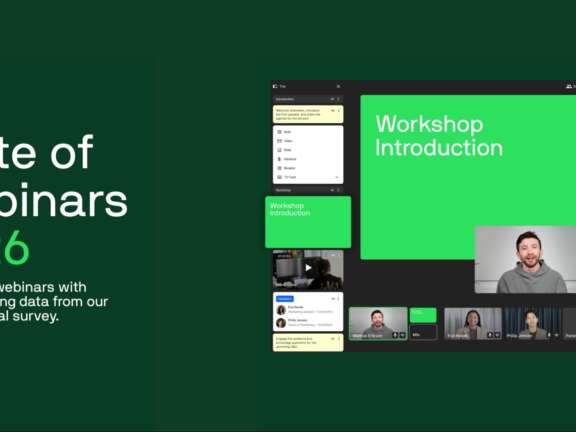
Follow Per as upgrade's his moms aging Umbraco 4 website to Umbraco 7.4, makes it amazing and at the same time moves it to Umbraco as a service so he never again has to worry about upgrading Umbraco himself.
View transcript
Okay, so maybe we should start, and we can start by turning on this Swedish jazz. There we go. So, welcome. So, mom. Everybody has a mom, and many of you have also made mom websites. I've been attracting people throughout this conference with people talking about how do you handle your mom and your mom's websites. So, it's apparently a common pattern in the Embraer industry that you have to make websites for your moms. I even have one guy questioning me, I have a PHP site, can I just convert that into mom compatible cloud solution? The answer is no. So, this is my mom's website. She has a business. She has a place for cloud. She has kids from broken homes where she helps them get ready for the life ahead of them. And she naturally has a website as well. So, this project actually started because this website is nearly 10 years old. It started out as Embraer 2. And then the super cheap host I chose decided just to shut it down, so I had to upgrade it to Embraer 4. So, that's big luck actually. So, it's actually possible to upgrade it. So, this story actually starts when the state came to review her business. They do that every year. And the new point on their review plan is, are your websites responsive? And that is something the state cares a lot about apparently. So, she called me in panic. We got like a minus one point on the scale and we are not responsive. What can we do? And I said, why do they even fucking care? Sorry. Why does the state bother about if your website is responsive? But apparently they do. And also they have the random Drupal guy calling all the time saying, this is not responsive. You should use Drupal instead because that's much better and so on. So, that's where this came from. That's why I'm migrating my mom to Umbraku 7 and Umbraku as a service. So, yeah, this is a website. It's running 4.5.2. So, it's actually fairly new. I saw a lot of people on Twitter saying, hey, my website is older. Yes, good for you. Anyways, and this is the host which also became a bit of a problem as well. Just getting the stuff out of that place was... This is not the actual host but it's the Danish equivalent of it. So, this is our problem. We have a really old website. We have a really old version of Umbraku. We have a design in need of an update so it fits the state responsive website requirement. And we have super-duper cheap hosting which we want to get rid of. And we have the risk of ruining future Christmases and birthdays. So, that's kind of the problem that we need to solve. So, never don't give up. It is actually easier than it sounds. It's a three-step process. The actual upgrading and migration part is fairly easy. So, you'll be surprised how easy it actually is. So, that's mostly what this session is about. Never don't give up. It is easier than you think it actually is. So, the three-step process is we're going to upgrade the website from Umbraku 4 to 7.4. We're going to migrate the website to Umbraku as a service using a couple of probably unknown things in Umbraku as a service. I'll also explain you to why things are like they are so you can do it yourself and know what you're actually doing. Then finally we'll enhance the design and replace some old bits in there. We won't really go into how you migrate old templates because I think most of you know how to write Razor code in your templates. So, we won't delve into too much of that. Okay. So, first step is upgrading Umbraku from version 4 to version 7. A lot of people have questions about this on Twitter. Is it safe to upgrade from this version to this version? Can I do these two specific versions? And generally speaking, unless your site is older than 4.0, then the answer is generally yes, you can. When we talk about upgrades, it's in regards to the database schema. So, if you're using some weird obscure private method in one of the APIs in your templates, then it makes it a bit trickier. But most people when they talk about migrating, they actually just talk about migrating. They talk about migrating the database contents into a new and nicer database so they can actually use it with 7.4. Then you can always handle the kind of the small quirks in the templates and so on. So, lots of questions on that. There's even people asking about this for freelance jobs. Even Ismail who's been using Umbraku for 10 years is kind of uncertain if you can actually upgrade minor versions. Dirk also have problems with it as well for this very specific one. But Arnas knows that you can and it's really smooth. But most things people think is like this. You have to go through all these things and you end up down here. But it's not. So, this is really more a matter of a perception than it's actually a technical challenge. So, just do it. So, let's have a demo of that. Here we are. So, just to give you an idea of the setup here. I have the old site. This is the old version 4 site. And it looks fairly like the 7.4 site in regards to file structure. And that's because we've kept compatibility in place all the way through the years in the different major versions. So, this will look fairly the same as a 7.4 site. And over here, I then have a new release that I downloaded. And the only things I've actually made changes to this one here is that I copied in the old templates. I copied in the old media. And some other static files. That's the only changes I made on the file level. Then in the web configuration file, I actually took the new web configuration file from the release I just downloaded. And then I pointed it to the old database. That's this one here. This is the 4.0 database. Which I finally got from the T-posting. Restored it on my machine just using SQL Studio. So, if you can get a .bak file. A SQL database backup file. Then you just put it into a SQL Studio solution and restore it as a database. And then connect your site to it. So, that's the only two changes I've actually made. Are these. So, if I do that. Then over here, if I just start this up as a web server. We'll just wait a moment. So, you can see I get a login screen instead of the install screen. And actually, if you see the URL up at the top. It says umbraco authorized upgrade. So, this goes into a login procedure. So, you actually are prompted to log in before you start running any database migrations. So, if I can remember that all login. There you go. So, now you see the drum. And it's now telling you that it's upgrading umbraco. So, umbraco knows what version it is. It then has a script for each individual version that we made the last three or four years. It knows the differences between each version. So, every time we make a new minor version that we have a database change in. We just make a small migration script. That actually tells the installer what to do between each individual version. So, it just goes through them all. Boom, boom, boom, boom, boom. One step after each other. So, it's not magic. It's just one small step at a time. And you can see now I actually have this 4.0 site running in here in the tree. And I think with a bit of luck we can open this up. And you can see it's now running. So, that is all there is to it. It's not a big maze of actually doing things. And this is probably the most boring demo you've seen here at CodeGarden. But now that you just know that you can just take an old site, restore the database. Just kick off the installer and get it running. Then you can actually have a site up and running in five minutes. So, this is our first step getting on a proper Umbraco version. Then we can always make it better. We can always start replacing the design, which we'll do later. So, a bit of background. Why does this work? Is this magic? And no, it's not. So, if you look in the source code of Umbraco, if you ever dive into that. In the Umbraco core project we have a persistence section. We have a section called migrations and then upgrades. In here we have lots of different folders where we have these targets. So, if you're on version 4.0, we have targets for version 4.9.0, 4.1.0 and so on. So, this is the different versions in there. So, these folders each contains small individual classes that does one thing and only one thing. So, this is one of those classes. So, this class here in version 4.1.0. We added a XML preview table. So, down here we have a simple script. So, when we install this thing and we can see we were at this version and we're now going forward. We just execute this small script down here. Taking advantage of all the infrastructure inside of the column of Umbraco. So, we create a table down here and we set the columns as well. Just ensuring that the database is then running with the right tables. And we have that. And we have, I don't know, 100 different migrations for all these different things. So, it's a lot of just small tasks that can't really go wrong individually. And we just run through the script. So, it's not magic. It's just very well thought out. Also, the question is always, can I do this the same thing with my package? Can I use migrations? And yes, first of all, you can use migrations yourself. So, if any of you were at Dave and Jerome's sessions yesterday about push-pull. Yesterday, about pushing Umbraco to the max. They also talked about migrations and how they use them to upgrade their individual tables. You can use all this tooling inside as well for your own tables. So, if you have an old Umbraco site where you also need to update the different custom tables you have in there, you can do that as well. All the tooling is in place for you. And package migrations is also coming. Package migrations is, in short, a migration script but for your own custom package. So, when you install a new version of your package, it can do the same kind of version check. If you need to run any scripts between those two versions, that will also work in the same way. So, you can get a more managed way of actually upgrading your site as you go along. So, that's all built into the core and available to you today, actually. So, summary of actually upgrading Umbraco. Get the site running locally. Copy all the needed files into the new site. In this case, I didn't need to. But if you have custom sections or settings in Umbraco settings, you have custom security and so on, you just need to merge those two things. So, compare all the files in a proper diff tool and you can see the changes right away. Over the years, we've made our own configuration files simpler and simpler and simpler and more consistent. So, it is actually a fairly easy job to point out in your files what is right and wrong. Then you need to set the database connection string pointing at the old database. And also remember, I forgot to show you that, but you need to also set the old version in webconfig. So, Umbraco knows that it's on an old version. Otherwise, if you don't set a version, it will try to start up the installer. Then it will hit the database, find out it's not empty, and then it will actually go into upgrade mode and try to figure out what kind of version it's at. So, just try to do some checks to see where am I at, what do I need to run. But to be absolutely certain that you hit the right point in, well, history of versions, set the version yourself. And then start a site. And that's it. You can run the installer and then you're pretty much up and running. So, migrating Umbraco. That's the next step. So, upgrading was fairly easy. Now we need to put this thing on Umbraco as a service. So, first of all, we start out by creating a new project. We need somewhere to push all these things that we're actually making. So, we create a new project. We then get a git URL. We do that inside of the UI of Umbraco as a service. So, you do a git clone for that specific URL and it will give you all the files and actually all the infrastructure bits that an Umbraco as a service site needs to restore locally. So, you get that all out of the box just by git cloning the site locally. For migrating, you probably need to do some basic cleanup. I at least did. So, I got rid of all the master pages files. I didn't have to. I could easily just push the master pages file up to Umbraco as a service. It is compatible. It will just work. But not to get stuck in being stuck on very old stuff, I just very quickly upgraded all my template files. So, getting rid of the master pages and just copying in the HTML into Razor views and replacing bits and pieces, then it worked just fine. Even running the old XLT macros worked just fine as well. So, cloning a US site down locally. Copy those files that you just cleaned up. Into the site. Then we need to generate some courier files. And I'll get into what that actually means in a moment. And then we finally need to also transfer the content up to Umbraco as a service. So, that's the, this time, five-step process of going towards this. But again, this is not rocket science. It is actually very simple to do. So, all right. So, we go over here again. So, we'll shut this site down. And start up another site. So, in here, to show you, this is the site that I just cloned from Umbraco as a service. Again, it looks very similar. In here, we have, well, just the normal structure. There's only a couple of extra things that you might notice. It's the data folder. So, the data folder is a specific thing for Umbraco as a service. This folder is important. It keeps all the infrastructure bits of any Umbraco site. And when I say infrastructure bits, that means data types, templates, macros, well, developer assets in general, actually. All the stuff that you create for the editors to be able to create content. So, that's all stored in here as files because we can't pull down a database through Git. We need some other storage mechanism that allows us to move it freely between environments. And if we look what's in here, by default, that's just a bunch of macros. That's it. And these come from forms. This folder is generally empty. So, let's try to start up this site. I just need to stop this because I need to tell you something first. So, let's go back in here because there's one thing I forgot to mention to you. And when you pull this down this side here, in the web config, this is the actual configuration file that you get from Umbraco as a service. You can see that it already has a version set in here. That's not a mistake. That's just how Umbraco as a service works when it tries to restore the site locally. And also, further down, you can see that it's actually using a local. Local database. So, what we needed to do is we need to point it at a new database. So, we'll point it at that one I just restored to before. So, instead of making this Umbraco as a service site restore as a new embedded database where it just puts all the data in as you need it to work locally, instead, what we'll do is we'll point it at the thing we already created. So, we already have data locally. And then we'll kind of trick the U.S. into thinking that it already has stuff. This sounds more as a hack than it actually is. What we're actually doing is we're just pointing a website at a database. So, it's not, again, that fucking science. It's only my screen that's going up. Okay. So, in here, I have a bunch of migration files. And it's, again, just the static assets. So, CSS, media, script, user controls, views, and XLT that contains all this stuff from my site. And then I have this web config here. Just to show you again, it's the exact same thing as I showed you before. But the thing I've changed is I'm pointing it at that restored database. Okay. So, that database is a 7.4 database. When I point this site at it, it'll just start up and just work. So, I'll take all these files, put it in my restored site here. There we go. Overwrite the thing. There we go. So, just copying things in, copying in the web config. And we can start the site up now. There we go. So, same site again. Not very exciting. But it's now running with the restored Umbraco as a service site. It now has all the knowledge about how to go to Umbraco as a service. It has the connection points and the UI inside of it. So, if I go in here. Then you can see I get the dashboard. I can see this is a local site. I have my live site over here. I don't have any pending changes. But it's the same content tree because it's the same database. We're just pulling it in from the database. Also, I have a bunch of things over here. Document types and templates and so on. So, what we need to do now is we need to push all the infrastructure bits to Umbraco as a service. So, the server in the clouds will actually know about these things. So, we need to make Umbraco as a service. And it will receive a deployment from us where it then can restore the site up there. So, we can keep on working with it and share it with anybody else. So, when my mom is going to git clone this site and open up Vim, they'll just work. So, to do this, we need to call a very special URL inside of the back office. Which makes my local site generate all these files that we need. The courier files I mentioned before. So. Thank God for Chrome history. This is the URL. So, if you go to umbraco.com back office. Slash API. Slash courier admin. Slash rebuild. That will call an API controller that we made. It will return this very reassuring output. But it's rebuilding. What this means is that it's rebuilding the entire infrastructure of our site as files. So, it's just taking database data and putting it into the data folder. So, in here we have a revision folder. So, now there's all of a sudden stuff in here that we can use. So, if we look at something really simple like a template. Here we have the different templates in here. So, if I open this up, you can see it's just an XML representation. So, it's basically just the object from the back office serialized to XML. Could we just zoom this a bit? Yes, we can. Maybe not so much. View. Zoom. How many minutes do you need to zoom? Well. Okay. Well, this is enough. But what's in here is a couple of specifications about what this thing actually is. So, it contains a couple of IDs. And it contains an item ID. So, the item ID is interesting. Because this is what enables umbraco to actually identify this thing. Across environments. So, this ID cannot change. As you probably very well know is if you deploy content between different sites. Then IDs have a tendency to change. Because they're based on identity on the table. Which is very annoying. Because you usually have IDs in several places. So, in this way, using these files, we find some sort of unique identifier for the different items inside of umbraco. And use that identifier in these files. So, no matter if I generate this file on my local machine. On my dev environment. On my live environment. Then that identifier will always be the same. Okay. So, we have something that's transferable now. We didn't have that before by using this ID down here. Because this table, template will not have that ID on our remote site. Because it will change. Based on when it is actually installed. So, that's why we need this item ID up here. So, the item ID is the alias of the homepage. And then we have a provide ID that basically tells umbraco as a service. This is a template. Treat it as a template. So, that's the files. And what we'll do now is we'll use our Git client. So, we'll go into the site that I created. And you can see there's now a bunch of changes. So, when you Git clone a US site, it's a Git repository in your local machine. So, you get all the history. So, what we'll say is we'll add all these new files that are just copy pasted in. And I'll commit these. There we go. And I'll then push the changes to US. And I'll do this. I can show you some slides. So, summary. You need to Git clone that URL. You need to run this rebuild URL. You need to call Git add to add all the files. You need to commit them. You need to push them to US. And finally, which we haven't done yet, we need to also transfer all the content. Maybe you noticed before. the data folder in there did not have any references to content whatsoever. And this is based on experience, really, because in the beginning, we actually thought we should git all the things, just put content into files and just push them with git. But the problem is there's so much of it, and there's so many references between it, so there's a very high chance that you've hit merge conflicts just by changing two or three letters in a big chunk of HTML. Git will kind of freak out and have no idea what to do with that. So if you're an editor, and you're running this thing on your local machine, and you're then asked to git merge content, then that does not make it easier. So we find a different way instead where you can just HTTP transfer this content to a web service instead. So that's why there's no query or fast for content, which we'll see if the actual process is now done. So you can see here in the terminal, it says deployment successful. You, by the way, do not need to use a terminal. You can use a proper git client that actually gives you a UI, the GitHub client is actually fairly good. It also works with sites like this. So you can use that, or you can use git kraken, or what's the other one? Source tree. There's a couple of different clients. So use the one you like. It's just standard git. So in here, instead of opening this, we'll open up a dev site on back-order service, which is not a dev site because I took a single environment. And while that loads, it needs to fire up the application domain or application pool. There we go. So we now have the site without content. But if you look in here, we have the tables, the templates, and we have the document types. So all the infrastructure bits, they're now in place. The last step is just getting content up and running. So as I talked about before, git is not really an option for that. It makes it too hard, too many mergers, too technical. And really, when you're working content, you just want to, boom, click a button and get it over with. So what we can do in here is we can right-click the root of the content node, queue it for transfer like this, and then just send the content to the live, which is not possible. Damn it. Why is that? It's actually because I have an old cookie from the old website. So that's why I'm logged in as a different user. Let me just log out. So let's go to that. Okay, so now I should be the right person. Let's just check. Yep, now I'm not admin anymore. So let's reload the queue. There's no thing in here. The queue of content is based on the user. Every user can kind of have their own content queue. So I'll just try again. So now we're packaging. So what this does when it actually packages these things is that it compares with the remote service. It says, I'm packaging all this content here, but to actually transfer this, I likely also need some document types. So this is the list of document types. Do I actually need that? Do you already have it? And in this case, the service will just respond to me saying, well, yeah, it's already there. Just get pushed it. It's all fine. So here we just get a, I'm now ready to transfer the changes to live. And it gives me a list because in cases the content is actually identical, it'll just filter it out so we don't need to transfer it again. So I get the final list for approval here. I'm going to scroll and scroll and scroll and then transfer everything. So now I'll transfer the changes. Now that it packaged all this full manifest, it'll deploy it. It'll deploy all the media files as well. And when it's done, I'll say, yay, you are done. There we go. So when we go over here again, we can refresh. And now we have the full structure over here. So we move from local to the service. Now when anybody git clones this site, they can pull it down. And on their local machine, they can actually go in on the root content node and they can actually right-click it. Where did it go? There used to be a restore content here. I don't know where it's gone. Normally, if this actually worked, there's normally a restore button in here so you can just tell it to restore all media and content. So if you, ah, I know why. It's because there's no environment to actually restore from. That's why it's not here. If I do it over here, there you go. So you have a restore action in here. And what that means is if you're spinning up a new site locally, you'll get the same kind of empty site without any content or media. And then you can just go in here and say restore and it'll pull it down from a request service. You'll get the entire site. You can start testing against the content that's actually on the live site. Okay. You had a question? Yeah. It asks the service. And it also, what it does is it generates a hash based on how the content looks. Takes all the values, makes it into a small hash string, then sends it off to the services. It's disidentical. So that's how it does it. It varies actually depending on how things are processed. In some cases, it's just important that the thing is there. For example, templates. The site will work just fine if the template is there. It won't crash. It doesn't really matter if the markup is the same. You're responsible for making sure that the markup is as it should be. So we don't want to block a deployment because someone made a HTML change. Okay. So now we HTTP transferred all the content and all the media. And we now have the full site running. We can now pull it down. Any developer on this project can pull it down, start working on it, pull down content, and so on and so on. So now it's actually on US. So that's the migration part of it. So we already had the summary. Now we've done HTTP transfer content. So just to give you an idea of this, this is just a quick overview. So you have a database. From the database, we can pull content out and we can transfer it via HTTP. We can also tell the database to generate these courier files. It will also do that automatically if you make a change to a document type. It will regenerate the courier file. You check that in with Git. You just Git push it to a marketplace service. The service will make sure that it's properly deployed and installed. So that's the grand overview of how moving from a local machine or any environment to another one happens. On a marketplace service. Okay, so a bit of stuff to watch out for. If you use node IDs in templates, these node IDs will change as you move content between environments. So never use a node ID because it will change. You cannot be dependent on a node ID. Instead, use a query. Use an XPath statement to find it relative to where you are in the structure. That's much better to do and it will easier make your site transferable even if it's outside of a marketplace service. Never depend on these magic IDs. They will change. Macro parameters, also if you use IDs in there as well, it will make things break. Also, be careful with unsupported and old packages. If you have a package that uses the old data layer or just accesses the database directly, you have to be very careful because if that package makes changes to Umbraco data but doesn't tell Umbraco about it, then we have no chance of knowing that it should deploy new changes. So if you kind of bypass the services layer in Umbraco, then you will be in a world of trouble at some point. It's of course hard to know if a package doesn't use the services. It's something that we try to make easy for you to determine by checking different popular packages and see when they start being used on Umbraco as a server if they actually work. We also check with our support guys to see where do we have problems with different packages. So we try to avoid it. We try to give our stamp of approval to good packages. But you might end up with some old site that has some old code that just goes, straight to the database with SQL. In that case, we have no chance of actually figuring out if a change has been made. Finally, if it's not following file conventions, it uses files in weird places, we don't monitor those files. So in that case, you might be making changes that we don't see and also not able to deploy. Okay. And we actually have documentation on this. So you can, that's documentation on github.com documentation. It's also, I think it's also on our site. But handling deployments for an existing site is also documented. Including that weird magic URL that you have to call. And this works for any site that runs with the, that works with a database that Mbako works with. So we access it to, in Hibernate actually. So if it's a database that works with Mbako, then you can pull out data of that database and turn it into query files. And then it's kind of in a neutral format. So I know that it works with SQL Server and MySQL as well. So these are equally supported. And SQL CE as well actually also. Okay. So final bit is that we need to tweak the design a little. So I'm guessing that most of you saw this yesterday in the keynotes. So let's just do that thing one more time. We want to replace the old design with a new one. We want to iterate over the design changes in my normal tooling. And we want to do it from a Mac without actually having a virtual machine to do it for me. So maybe we should wait with this. So the people who didn't see it yesterday can just see it now. So here's the site. Here's the site on my local machine. Again, I cloned it down. I cheated a bit here. It's not the exact same site as before. But I only have 45 minutes. But this is the site. And what I need to do now is the files on the left, I need to connect it with the browser on the right. And to do that, I'll open this up in the terminal and run this command here, us watch. This is because I've installed a Node.js module called us, or us cli, actually. This will give me a global command called us. And in here, I'll log in. And then I see the site. So it's just pulling things down as before. CSS, JavaScript, and the HTML is from the service. So if I make a change in here to the homepage, we can get a quick Danish course. So Nyheder, that's news. Om oppostet OASen drønkort. About OASen. Really short version. There we go. So as this saves, you can see it starts refreshing over here. And then it does this. So now it's changing the HTML. So it's sending a browser, returning HTML to a proxy, and now it just re-renders. The same thing with the CSS, but you might notice a different speed on that. So again, if we change this, we can make a bit of a variance and make it green. And again, you can see as it does this, it does it instantly. And that's because when it's actually fast, it doesn't require a server to render. It just puts it into the proxy right away. And then in the background, it just sends them to a Microsoft service afterwards. So it does it in the different directions, so you see it changes faster. And that's how that works. So this tool is built on a particular browser sync, which is a general kind of testing, prototyping tool. It's also built on Node.js. So our amount of code in here is actually really, really slim. I'll show you in a moment how this is actually built up. But doing these changes allows me to quickly see changes on my local machine, and I'll let Umbrako's service become the web server for me. The proxy is running in a simple web server on my machine, and it should run on every environment out there. So Node.js is compatible with Mac OS, Windows, and Unix. So anyone can run this with their own tooling. So let's look at that grand overview now that you see how it actually works. This is my keynote illustration skills in full effect. So over here, we have my local machine. I can run any kind of editor I want in here. And when I start up this UMS watch process, it keeps track of all my CSS, HTML, CSS, and JavaScript files. It looks at the folders, looks at the actual files on disk. So it's not a plug-in to an editor. It's just a plug-in into the file system. So wherever you run before the file changes, it will trigger the change in the CLI, and it will send up the changes. That also means that if you use LIS or SAS or CoffeeScript, TypeScript, or any kind of pre-compile for your front-end files, as long as the end result of that pre-compile is put into one of these kinds of files in those specific folders, then when that file is copied from the SAS compiler into the CSS folder, it will trigger the change, and it will trigger the tooling to send it off to the proxy. So it doesn't really matter what you do, but before these files are generated, you can do whatever you want. And if you want to do it in a different way using grunt.gulp, you can also do that. It's completely separated from all these toolings. There's no kind of dependency on any task runner or editor. But what happens? It sends the files. The static files are just sent directly to the proxy in the background send over here to Umbraco as a service. And CSS and HTML files are special because we can't render them locally because of the dependency on .NET. So we send them over. We send them over here first, and it will return the HTML to the proxy, and it will show that HTML. So that way we can keep on iterating over these different kinds of files. And also, as we see over here, we have a live site that will update in the same kind of time. It doesn't automatically refresh. That's your own job. So that's what the browser sync stuff does for you. Yeah? Yeah. Sorry. Yeah. Yeah. Yeah. Yeah. Yeah. It doesn't rely on all the resources being up here. Because in our scenario, you might have a specific one where that is needed, but in our scenario, to actually render a page down here, we need some CSS and JavaScript. And we, pull that directly from the local file system. So we don't actually need them from up here. So this is what this proxy does. We tell this proxy that whenever you need something that's called JavaScript or CSS or in any of these folders, just fetch them locally. You don't need to ask the service for them because they'll just slow everything down. So that was what you meant? Okay. You were nodding, so I thought you were nodding. Yeah. So if you have nested templates, then of course it requires it to be up here. What we get down here is the rendered result. So it renders up in the context of Open Bracket as a Service. So if you have a change done on layout.cshtml, that is sent up as soon as you save it. When you then change the other file, then that is saved and sent up. So you might actually see a YSERD every now and then. We can try to do it just for the fun of it. Because for the proxy, it doesn't matter if it's a YSERD. It doesn't care. It just thinks it's an ugly design. So how to do a YSERD? I'm so good at coding that I don't know. So will that break? Yeah, there we go. So now you get an error. Then when I make a change again, it'll just say, well, that was a new change. Less ugly design. I'll just refresh again. So you will see this every once in a while when things get out of sync. But then you make the next change and see it go back again. Which is actually a good thing because when you're starting to do Razor, you can do that locally. You can do all your Razor queries. You can see this gives me two news items back. This gives me nothing. This gives me a YSERD and so on. So it's part of the feedback loop that you get these errors. Yeah, in this case it does because I edit directly on live. But you can just have a dev environment between you and live. So you do all the stuff directly on dev and then you send it off. So that's the proxy. How it works. How you can use it. So let's go back to the keynote again. We did the demo. So try it out. You need Node.js. You can go to Node.js.org. It will install on Windows, OS X and so on. Then you call npm install us slash cli. And actually, very important before you take photos of the slide because otherwise you'll send me emails afterwards. But this doesn't work. You need to also make it global. Thank you, keynote, for adjusting that spelling mistake. Has cli. There we go. This is the correct thing. npm install us cli slash g. The g part makes it a global Node.js module. So it installs it as a global alias in your terminal. And then you just call us watch. If you only say us, then it will guide you and actually say you probably meant us watch. So it's a general terminal command where we will probably start at attaching additional commands as well if we need it. So you can also find it on npm.org. So, as I said before, it doesn't really matter about editors or workflows because you can just attach this to anything in here. This is a quick Gulp example. Scale down as much as possible. But in here you can see I have a Gulp script. For anyone who knows Gulp, then this is not completely obscure. Gulp has a watching module. So we'll, we'll make Gulp watch all the files. So we can decide what files to watch. We can also decide when to trigger the different commands. Then we have another NPM module called us slash proxy. So this takes all the CLI parts out of it. If you don't need the CLI, then you can just call us slash proxy. Put it in here as a module. What we have down here is we create a configuration for the proxy that needs a URL to the site. It needs a username. It needs a password. You can store these in any however unsafe way you want. But that's what it needs. Then you need to initialize the proxy so it starts being ready for receiving the files. And when you say proxy.init it will also open up the browser with the preview of the site. Finally, we'll start watching the files. This is for Gulp. That's why it's orange. Down here we get the file path when the change happens. And down here we'll tell the proxy to either delete or upload the file. So it's a very simple API. It just has delete and upload. That's what it can do. And then you can use this with whatever kind of tooling you want to. So it's actually three Node.js modules. You have US CLI that watches all the files. It opens a proxy. It syncs the files. Everything. You just need this one thing if you just want to get up and running. Then we have US proxy. You can install that with NPM as well. It will be the proxy and the file sync. So we'll open up the browser. You'll be responsible for actually watching the files and telling the proxy to refresh. So that's for the people who want to use Gulp or Grunt or Broccoli or whatever they're called. And finally we have the low level stuff down here. It's the US core library. This will sync the file changes and it can also sync deletions with US. It runs to a web socket connection. In your terminal you can open this up and say delete this, delete that and so on. That's what it's responsible for. But you don't get the proxy. You don't get the local preview. So you can use whatever kind of level you want of this tool. They're all publicly available on NPM now. So summary. Corvo and Bracco, it handles upgrades. It makes it easy to go from version 4 to version 7.5. There's a seamless migration path to US for existing sites. Just regenerate the files. Make sure you have the latest database that fits with the version of US. That's where the upgrade comes in. The combination of the service and the CMS is a help in your workflow. It makes it much easier to migrate your mom's website or any other kind of site. So that's the three-step process and this is a summary of it. Mom approves. Her website got live yesterday just before the keynote. That was slightly stressful but it's now up and running. So if you want to go further, there's a session about content flow and deployments at 1.30. So that's, well, soon-ish. With Klaus from the HQ and Søren Spelund from eCommerce where they're talking about how to move eCommerce back and forth and how content flow in general acts between the different environments on a Microsoft service. Thank you. And is there any questions? Or you can applaud. Maybe applaud away, Klai. So any questions? Now that Kyle is done. Yeah. Yeah, you can. Yeah. There is a configuration file where you can tell it to watch different folders. Let's see if we can find it. Maybe it doesn't do that anymore. But yes, there is one. It's just not in this environment. But there is a file where you can preset all these things. That's also why it actually remembers my username in the console if you noticed. So it saves these kind of things. I think it's the last one here. So yeah, there is a file here and it just has these standard file globs to tell it which kinds of things to look for. Yeah. Yeah. So every time you save something it makes a git commit? No, it doesn't make a git commit instantly. No, it doesn't. So when you save anything on the local environment, it will just update the courier file. And that's it. You're responsible for doing the git's pushing. So it's a two-step process. And we do that because sometimes people just play around and don't really want it to go live instantly. Is that with a CLI package or that's... The only reason I ask is that when I'm playing around with this while you're in your stage and every time I do a save, it's been queuing up a commit. So I have like 30 commits in the queue ready to go to the lot that have been pushed up. Oh yeah, because the service actually noticed them up there. Yeah, it does. Because it actually sends the file to the service and then it will start queuing them up. So we're talking about two different environments. So when a change happens up on the server, you don't have git tooling. It's kind of headless, really. So it has to kind of monitor the changes being done and will think that these are ready to go to live. Okay. So if I'm working locally and I have another designer working locally, how does it handle and sort of merge? In this, for the CLI or for git in general? I guess for the CLI. For the CLI, if I make a change in the back office, that change is actually pushed down to my machine. So it, yeah, there's two ways. So if I make a change in the back office or someone else makes a change in their client, it will send it to the back office, the back office will send it to me. So it requires a bit of coordination if you are two guys working on the same file because you will override each other. But that is the only way to actually do it. That requires communication because technology cannot run on the same file. It will really solve that problem for us. Okay. Yeah, any other? Yeah? Yeah. You upgrade them yourself. Because the data will display on the website, but for regards to the back office, when we upgrade, we just turn them into labels. So it will just be display only and it will display the same kind of content on the website before, but you need to rebuild the UI. If it's using a user control, then you need to rebuild it. For many things, there's already compatible new properties, but of course, if you have very custom stuff, that is part of your upgrade story. Yeah. Yeah. Yeah. Yeah. In general, it really depends on the package. It depends on what it does on application start. If it doesn't do anything on application start, you'll be able to just spin it up. But if it depends on some API that is not there anymore, then the site will fall over as any .NET site would. But in general, we have not removed any APIs. There might be some really old stuff out there that's using something that's gone. But in general, we have been very careful not to be removing things and instead just internally remapping them to new stuff. So the general advice is try it out. It might depend on the package. It's hard to say, really. We have been very careful not to remove something in the core. We have deprecated a lot of stuff, obsoleted it, but it's not gone. Yeah. It's from 4.0. Yeah, 4.0. We started adding migrations for 4.0. Any more? No? Thank you very much. Thank you.


